Start with a controlled Ragdoll test
Ragdoll Frenzy is a physics sandbox rather than a fixed-combo fighting game. Your first session should teach you to control space, change a Ragdoll's position, create a visible physical reaction, and recover before the environment turns against you. Start in Classic Playground, where the open layout is suited to testing movement, jumping, attacking, grabbing, and resetting without the pressure of a scenario objective.
The first useful target is not a particular weapon or a perfect finisher. It is one complete experiment: place a Ragdoll, use Grab to move it, apply a weapon or impact, observe the resulting knockdown or launch, and regain control when you are ragdolled. The Ragdolls guide explains how to stage that target before testing. Once you can repeat that sequence without standing beside an edge, rail, slope, fire, acid, or explosion, move to a scenario map.
Test Ragdoll hazards and contraptions
This moment supports the guide's advice to keep acid out of a clean physics test and then inspect the game's contraptions separately.
On PC, the commonly described layout uses WASD for movement, Space for jumping, left mouse for attacking, F for grabbing, and Shift or Q for dodging. Mobile uses on-screen controls. Treat those keys as a starting point and follow the current in-game UI if your device or version presents different bindings.
How playground tests become scenario runs
The game has a session-based structure with two useful branches. Classic Playground is the open practice branch: you select or encounter a Ragdoll, arrange the target and nearby objects, test an attack or device, and reset or repeat the experiment. Scenario details help you choose the right map once the basic test is repeatable. Scenario maps are the objective branch. They place you in a setting such as a home, gas station, hostage area, bank, or larger raid and ask you to manage a confrontation around that space.
The physics system connects both branches. A hit does not produce one guaranteed animation; the result depends on the struck body part, weapon, speed, direction, and momentum. A target can fall, lose balance, fly, or react around a limb. The same variables affect your character, so a successful attack is also a positioning problem. Keep an exit route, avoid fighting with your back to a hazard, and leave enough space to use Recovery.
A practical progression is therefore: learn the controls in the playground, test one interaction at a time, save Coins from knockdowns or wins, buy stronger available weapons when the shop allows it, then choose a scenario whose space matches your confidence. Home Invasion emphasizes close defense, Gas Station Ambush compresses several attackers into a tighter area, Hostage Rescue rewards careful target control, and Bank Heist makes movement and position important around an objective. Raid / Warfare is a broader fight for players who already understand recovery and weapon switching. Event maps can change with the event and should be treated as optional rather than as the first lesson.
Tools, hazards, and states to learn
Use the following elements as a beginner checklist. The Tools guide covers direct-use items, while the Hazards guide covers environmental dangers. Each changes what you do next rather than simply adding decoration.
| Element | What it changes | First use |
|---|---|---|
| Classic Playground | Open space for testing Ragdolls, weapons, objects, and vehicles | Practice away from hazards and reset after each test |
| Ragdoll Physics | Body part, speed, direction, and momentum shape the reaction | Change one variable at a time and watch the feedback |
| Grab | Moves, drags, lifts, or positions a Ragdoll or nearby object | Place a target before attacking or bringing it to a device |
| Weapons | Guns, melee tools, throwables, and special tools create different impacts | Test a controllable attack before taking it into a scenario |
| Recovery | Restores action after you or a target enters Ragdoll state | Recover quickly and do not accept a fight beside a hazard |
| Environmental hazards | Trains, edges, slopes, fire, acid, and explosions amplify knockback | Keep hazards at your side or behind the target, not behind you |
| Slow Motion | Slows the scene where supported so timing and momentum are easier to inspect | Use it to understand a difficult hit or device timing |
| Coins | Provide progression toward stronger weapons or other available content | Spend early gains on capability before cosmetic choices |
Grab is the most important non-attack interaction for learning. It lets you set up an experiment instead of chasing an uncontrolled target. Move the Ragdoll into an open position, apply one attack, and look for the physical feedback: a fall, a loss of balance, a launch, or a body-part reaction. If the target reaches a hazard, stop treating the result as a clean weapon comparison; the environment is now contributing to the outcome.
Recovery is equally important. A ragdolled player cannot act normally, and a fast recovery reduces the chance of a second hit or a slide into danger. Practice the recovery input in the playground before entering a scenario. Slow Motion can help you inspect a confusing interaction where the timing or momentum is hard to read, but its exact entry point can vary, so use the current UI rather than relying on a fixed menu path.
Your first complete playground run
- Enter
Classic Playgroundand make space. Move away from rails, edges, fire, acid, explosive objects, and the path of a moving train. Jump once to confirm movement and camera control. The checkpoint is a stable open position; only then choose a Ragdoll or nearby target. - Approach the target without attacking. Stand close enough to interact and use
Grabto lift, drag, or reposition the Ragdoll. Confirm that the target follows the grab rather than drifting into a hazard. If you cannot control the position, release it, step back, and try again from open ground. - Choose one physical test. Use one weapon, a throw, or a direct impact—not several attacks at once. Aim at a clear part of the target and keep your own escape space. The checkpoint is readable feedback such as a knockdown, loss of balance, launch, or a visible limb reaction.
- Separate the weapon result from the environment. If the target is thrown toward a train, slope, edge, fire, acid, or explosion, let the sequence end and reset rather than counting that as a pure weapon test. For a clean comparison, reposition the target and repeat with the same distance while changing only the attack or direction.
- Trigger and observe your own recovery. Allow enough distance for the target to respond, then avoid standing in its path. If you enter Ragdoll state, use the recovery action as soon as the game permits it. The checkpoint is restored movement; after recovery, turn toward open space before re-engaging.
- Add
Grabto the successful test. Once the basic attack is predictable, move the target closer to a safe object or supported device and test the interaction. Some experiments involve dragging a Ragdoll, placing it near a contraption, or observing what happens when a tool changes its momentum. Do not infer a complete puzzle or progression requirement from an isolated key or door reference; use only the interaction the game visibly supports.
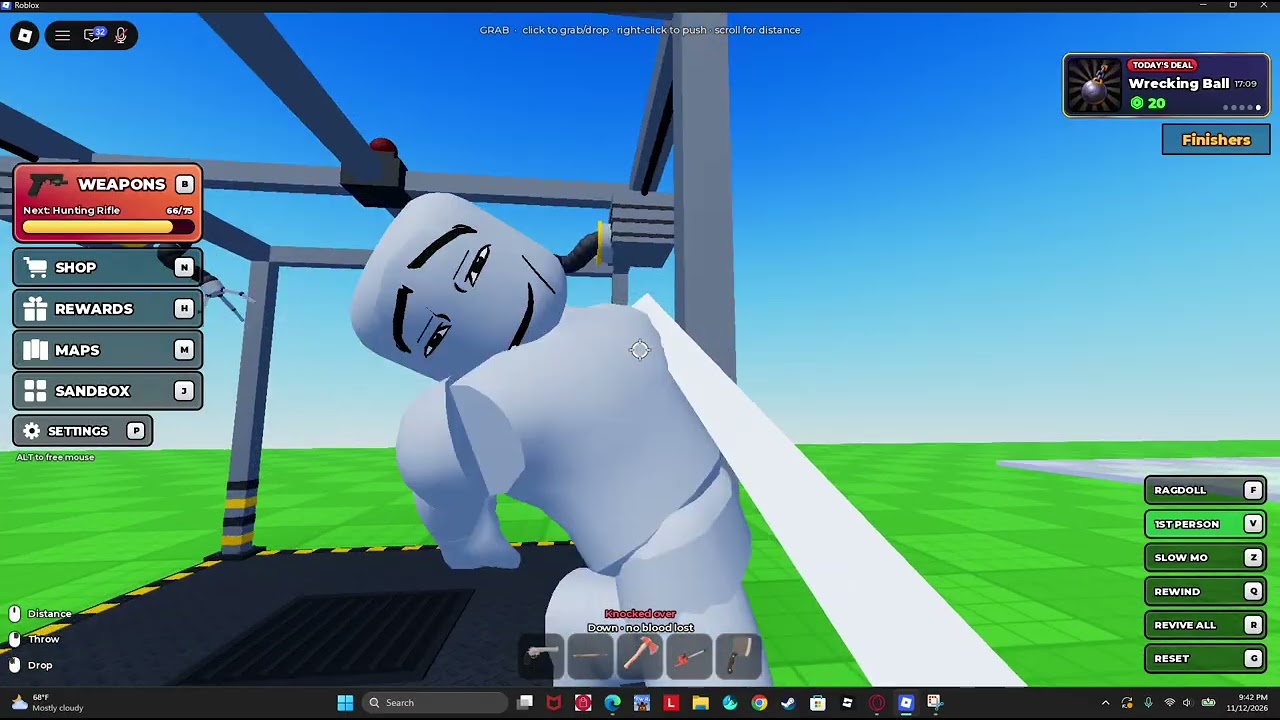
Test a Ragdoll device interaction
This moment supports the guide's device-testing step by showing a contraption that interacts with a Ragdoll's limbs and head.

- Reset and repeat with a different approach. Compare a melee hit, ranged hit, throwable, or available special tool only after the first test is understood. Keep a note of which attack gives you control rather than the most dramatic launch. The checkpoint is a repeatable result you can create without being trapped by the map.
- Carry the lesson into one scenario. Choose
Home Invasion,Gas Station Ambush,Hostage Rescue, orBank Heistbased on the space and objective you want to learn. Enter with a safe route in mind, identify the nearest hazard, and use the same order—position, control, single attack, feedback, recovery. If you can finish the encounter or verify its objective, use the earned Coins toward an available weapon upgrade; if not, return to the playground and isolate the step that failed.
Priorities when a run goes wrong
Keep these priorities in order: survive the position, recover control, separate one variable, then pursue the objective. A stronger weapon cannot fix a character trapped beside an edge, and a fast attack cannot replace a safe retreat route.
- You fight with a rail, edge, or hazard behind you → stop attacking, move sideways or jump toward open ground when control returns, and restart the test from a safer angle.
- A Ragdoll flies farther than expected → do not chase it into danger; release
Grab, watch the momentum settle, and reposition before trying the same interaction. - You are knocked down and hit again → prioritize Recovery, face open space after standing, and only resume once the target is no longer in immediate striking range.
- You cannot tell whether the weapon or environment caused the result → reset in
Classic Playground, remove the hazard, and repeat with one attack and one changed variable. - You lose control in a crowded scenario → retreat through the route you identified on entry, recover, then engage one threat at a time instead of continuing a close-range exchange.
- You damage the wrong target during
Hostage Rescue→ stop firing, create distance, and switch to a more controlled interaction; the scenario rewards timing and target control more than uninterrupted attacks. - A new weapon feels powerful but difficult to aim → return to an open test, learn its distance and knockback, and spend the next Coins on a tool you can control rather than assuming the largest impact is best.
- The scene contains an unfamiliar device or event effect → treat it as an experiment, not a required objective. Keep a recovery route, test it away from your character, and follow the current game UI for any confirmed interaction.
The end of a beginner run is a reliable method, not a particular map completion. You should be able to create a controlled physical reaction, recover from a mistake, recognize when a hazard is changing the result, and choose whether to reset or continue. That foundation makes the scenario maps more readable and gives every later weapon purchase a practical purpose.
Ragdoll Frenzy beginner FAQ
Which map should a new player choose first?
Start in Classic Playground. Its open sandbox layout lets you learn movement, Grab, attacks, recovery, and physical feedback before a scenario adds an objective or a crowded fight.
What should I practice before entering a scenario map?
Practice placing a Ragdoll, applying one attack, recognizing the resulting knockdown or launch, and recovering from your own Ragdoll state. Also learn to keep rails, edges, slopes, fire, acid, and explosions out of your escape path.
Why did the same attack produce a different result?
Ragdoll Frenzy’s physics response depends on the hit body part, weapon, speed, direction, and momentum. A nearby hazard can also amplify the result, so repeat the test in open space before comparing attacks.
What are Coins used for?
Coins earned from victories and knockdowns can be used for stronger weapons or other available content. The complete shop list and prices can change or remain unconfirmed, so use the current in-game shop before spending.